Window locks wear out faster than most homeowners expect. Whether it’s a sash lock that won’t stay tight, a casement crank that’s gotten stiff, or a handle that’s simply broken, a faulty window lock compromises both security and energy efficiency. The good news: replacing window locks is one of the most straightforward home maintenance tasks you can tackle yourself, usually in under an hour per window. You don’t need special training, expensive tools, or contractor-level skills. This guide walks you through the process, from identifying your lock type to installing the replacement, so you can get your windows back to working order.
Table of Contents
ToggleKey Takeaways
- Window lock replacement is a straightforward DIY task that typically takes under an hour per window and requires only basic tools like a screwdriver, adjustable wrench, and measuring tape.
- Common window lock styles include sash locks ($5–$20), casement locks ($15–$40), and tilt-and-turn locks, each requiring specific matching replacements based on your window type and mounting hole pattern.
- A broken or faulty window lock compromises both home security and energy efficiency by allowing gaps that let conditioned air escape and increase heating and cooling costs.
- The step-by-step window lock replacement process involves removing the old lock body and keeper plate, cleaning the mounting area, marking new screw holes, and securing the new lock with proper alignment and testing.
- Catching lock wear early—by watching for resistance, gaps, or a wiggling handle—prevents you from dealing with a seized or stuck lock that becomes difficult to replace.
- Regular lock inspection and light lubrication every few years are preventative maintenance strategies that help avoid future lock failures and keep your windows operating smoothly.
Why Replace Your Window Locks
Window locks fail for predictable reasons. Age and repetitive use wear the internal mechanism until it no longer engages fully, leaving your windows loose and rattling. Damage, a broken handle, bent keeper plate, or cracked sash lock body, makes the lock unusable. Corrosion, especially on older metal locks exposed to moisture, can freeze the latch or prevent it from seating properly.
Beyond security, a broken lock affects your home’s climate control. A window that won’t lock tight often won’t seal properly either, letting conditioned air escape and raising heating and cooling costs. Replacing a lock restores both function and efficiency.
The best time to replace a lock is before it fails completely. If you notice resistance, gaps when the window is closed, or a handle that wiggles, don’t wait. Catching wear early prevents you from having to cope with a stuck or seized lock later on.
Types Of Window Locks And Replacement Options
Window locks come in several styles, and the type you have determines which replacement you’ll need. Most residential windows use one of three basic designs, each with its own strengths and quirks.
Common Window Lock Styles
Sash locks (also called night latches) are the most common on double-hung and single-hung windows. They’re usually mounted on the bottom rail of the upper sash or the top rail of the lower sash, and they feature a hook or cam that engages a keeper on the opposite sash. Sash locks are simple, reliable, and inexpensive to replace. They typically cost between $5 and $20 each.
Casement window locks are designed for windows that swing outward like a door. These often use a handle with a rotating cam that draws the window frame tightly against the latch keeper. Some casement windows use a crank mechanism instead: if it breaks, you’ll need to replace either the handle or the entire crank assembly depending on the failure point. Replacement handles and cranks generally run $15 to $40.
Awning window locks are similar to casement locks but designed for windows that open from the bottom. They use the same rotating-handle principle and have comparable replacement costs.
Tilt-and-turn locks (common on modern windows) combine sash and casement function. They’re more complex and sometimes require professional window repair guidance if the internal mechanism fails, though handle replacement is straightforward.
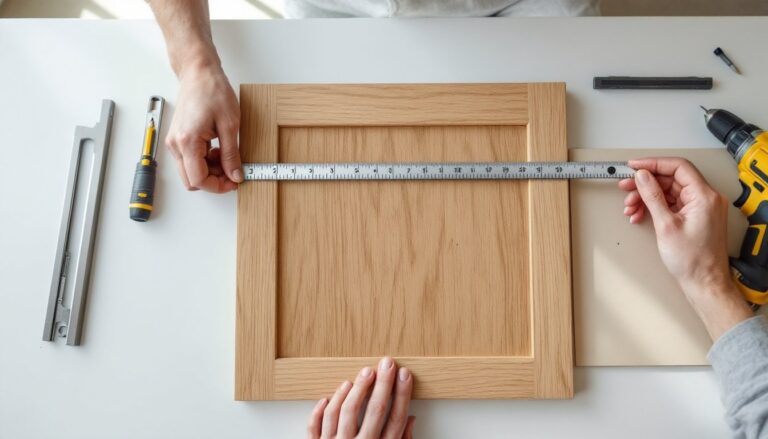
When choosing a replacement lock, match the style and size of your original. The keeper plate dimensions and mounting hole pattern must align with your window frame. Most hardware stores stock universal options that fit standard window sash dimensions, but measure your old lock’s mounting holes before you buy a replacement.
Tools And Materials You’ll Need
Window lock replacement rarely requires power tools. Here’s what to gather before you start.
Tools:
- Screwdriver set (Phillips and flathead). A cordless drill with screw bits works too, but a manual screwdriver gives better feel and control for small fasteners.
- Adjustable wrench or pliers (for loosening or tightening keeper plate bolts, if applicable).
- Putty knife (if you need to pry old lock bodies or keeper plates gently from paint or debris).
- Measuring tape (to confirm mounting hole spacing on the new lock).
- Pencil (for marking new screw holes).
Materials:
- Replacement lock(s) matching your window style and size.
- Screws (typically #8 or #10, 3/4″ to 1″ long, depending on the lock type). Most replacement locks come with hardware, but have extras on hand.
- Optional: lubricating oil or silicone-based window lubricant, if you’re replacing a lock that was seized or stiff.
Safety & Cleanup:
- Work gloves (leather or nitrile to protect hands from sharp edges and metal burrs).
- Safety glasses (especially important if you’re drilling new mounting holes or working at height).
- Drop cloth (to catch dust and small parts on the sill).
These items cost minimal amounts, and most are already in a standard tool drawer. The replacement locks themselves are the main expense, typically between $5 and $40 per lock depending on style.
Step-By-Step Replacement Process
The actual replacement follows a straightforward sequence. Take your time, and don’t force anything, if a screw or part resists, pause and assess why.
Removing The Old Lock
-
Open the window fully. For double-hung windows, raise the lower sash all the way. For casement or awning windows, crank or swing them fully open. This gives you clear access to the lock body and keeper plate.
-
Locate the fasteners. The lock body (handle or latch assembly) is usually mounted with two to four small screws. Look for the keeper plate (the curved or hook-shaped piece that catches the latch) on the opposing sash or frame. It’s held in place with one or two screws, sometimes with a bolt.
-
Remove the lock body. Use your screwdriver to unscrew the fasteners holding the lock to the sash. If screws are painted over, score the paint with a putty knife first to avoid stripping the screw head. Remove all screws and set them aside in a labeled cup: you won’t reuse them (the new lock includes its own hardware).
-
Remove the keeper plate. Unscrew the fasteners holding the keeper to the opposing sash or frame. If the plate is rusted or stubborn, apply a small amount of penetrating oil and wait 10 minutes before trying again. Once free, remove the plate and set it aside.
-
Clean the mounting area. Use a damp cloth to wipe away paint chips, rust, dirt, or adhesive residue from the sash where the new lock will sit. If old paint is thick or flaking, scrape it down with a putty knife so the new lock sits flush against the wood.
Installing The New Lock
-
Check the fit. Before fastening, position the new lock body on the sash, aligning it with where the old one sat (unless you’re repositioning to avoid a problem). The handle or latch should operate freely without binding. For casement locks, ensure the handle doesn’t interfere with the window frame when opened or closed.
-
Mark the screw holes. If your new lock’s holes don’t align perfectly with the old ones, you’ll need to drill new ones. Use a pencil to mark the center of each hole. A homeowner-friendly power drill guide can help if you’re uncomfortable with the process.
-
Drill pilot holes (optional but recommended). For hardwood sashes or if you’re creating new holes, drill a pilot hole slightly smaller than the screw diameter. This prevents splitting and makes screwing easier. Use a 5/64″ or 7/64″ bit for typical #8 screws.
-
Secure the lock body. Line up the new lock with your marked or original holes. Insert the screws (use the hardware kit that came with your lock) and tighten firmly but not excessively, over-tightening can strip the wood or crack the lock body.
-
Position and secure the keeper plate. Close the window to see where the latch sits against the opposing sash. The keeper should be positioned so the latch catches smoothly without binding. Mark the mounting holes, drill pilots if needed, and screw the keeper in place. The latch should engage with a satisfying click, not force.
-
Test the lock. Open and close the window several times. The lock should engage and disengage smoothly. If it binds or doesn’t catch, stop and adjust. Check that the window stays secure when locked and closes without gaps. For case ment or awning windows, the lock should draw the frame tight against the sill with no visible gaps.
-
Fine-tune if needed. If the latch doesn’t catch cleanly, the keeper plate may need to shift slightly. Loosen one of its screws, adjust the position a hair, and retighten. Sometimes a small shim (a thin wood scrap) behind the keeper helps align things perfectly.
Once your lock operates smoothly, you’re done. Clean up any sawdust or debris, and consider applying a thin coat of window lubricant (silicone-based, not oil-based, which attracts dirt) to the lock mechanism if it feels dry. Many homeowners find great success with preventative home maintenance strategies that include regular lock inspection and light lubrication every few years to avoid future problems.